Remote access to your Raspberry Pi has become a necessity for many users who want to manage their devices without being physically present. Enabling SSH (Secure Shell) is one of the most effective ways to achieve this. Whether you're setting up a home server, running a media center, or managing IoT devices, understanding how to enable SSH remotely can significantly enhance your experience with Raspberry Pi.
SSH allows you to connect securely to your Raspberry Pi from another computer or device over a network. This feature is particularly useful if you need to configure or troubleshoot your Raspberry Pi from a remote location. In this guide, we will walk you through the process of enabling SSH on your Raspberry Pi remotely, step by step.
By the end of this article, you'll have a comprehensive understanding of SSH, its importance, and how to configure it effectively. Let's dive in and explore how you can enable SSH on your Raspberry Pi remotely!
Read also:Leonardo Nam The Rising Star In Hollywood
Table of Contents
- What is SSH?
- Why Enable SSH on Raspberry Pi?
- Prerequisites for Enabling SSH
- How to Enable SSH Locally
- How to Enable SSH Remotely
- Securing Your SSH Connection
- Common Issues and Troubleshooting
- Alternatives to SSH for Remote Access
- Best Practices for Using SSH
- Conclusion
What is SSH?
SSH, or Secure Shell, is a network protocol that provides a secure way to access a remote computer or device. It encrypts all data transmitted between your local machine and the remote device, ensuring that sensitive information, such as passwords and commands, cannot be intercepted by malicious actors.
SSH is widely used in server management, file transfers, and remote command execution. For Raspberry Pi users, SSH allows you to control your device from another computer, even if it doesn't have a monitor or keyboard connected.
By enabling SSH, you can perform tasks such as updating software, configuring settings, and troubleshooting issues without needing direct access to your Raspberry Pi.
Why Enable SSH on Raspberry Pi?
Enabling SSH on your Raspberry Pi offers several benefits, including:
- Remote Access: Manage your Raspberry Pi from anywhere in the world as long as it's connected to the internet.
- Headless Setup: Operate your Raspberry Pi without a monitor, keyboard, or mouse, making it ideal for embedded projects.
- Security: SSH uses encryption to protect your data and prevent unauthorized access.
- Automation: Execute scripts and commands remotely, streamlining your workflow.
Whether you're a beginner or an advanced user, SSH is a powerful tool that enhances the functionality of your Raspberry Pi.
Prerequisites for Enabling SSH
Before you begin enabling SSH on your Raspberry Pi remotely, ensure you have the following:
Read also:Cruz Martinez The Rising Star In The World Of Entertainment
- A Raspberry Pi with Raspbian or another compatible operating system installed.
- An SD card with the operating system properly configured.
- A computer or device with SSH client software installed (such as PuTTY for Windows or Terminal for macOS/Linux).
- A network connection (Wi-Fi or Ethernet) for your Raspberry Pi.
Having these prerequisites in place will make the process smoother and more efficient.
How to Enable SSH Locally
If you have physical access to your Raspberry Pi, enabling SSH locally is a straightforward process. Follow these steps:
- Boot up your Raspberry Pi and log in to the operating system.
- Open the Raspberry Pi Configuration tool by typing
sudo raspi-configin the terminal. - Navigate to the "Interfacing Options" menu and select "SSH."
- Choose "Yes" to enable SSH and confirm your selection.
- Reboot your Raspberry Pi to apply the changes.
Once SSH is enabled locally, you can proceed to connect remotely using an SSH client.
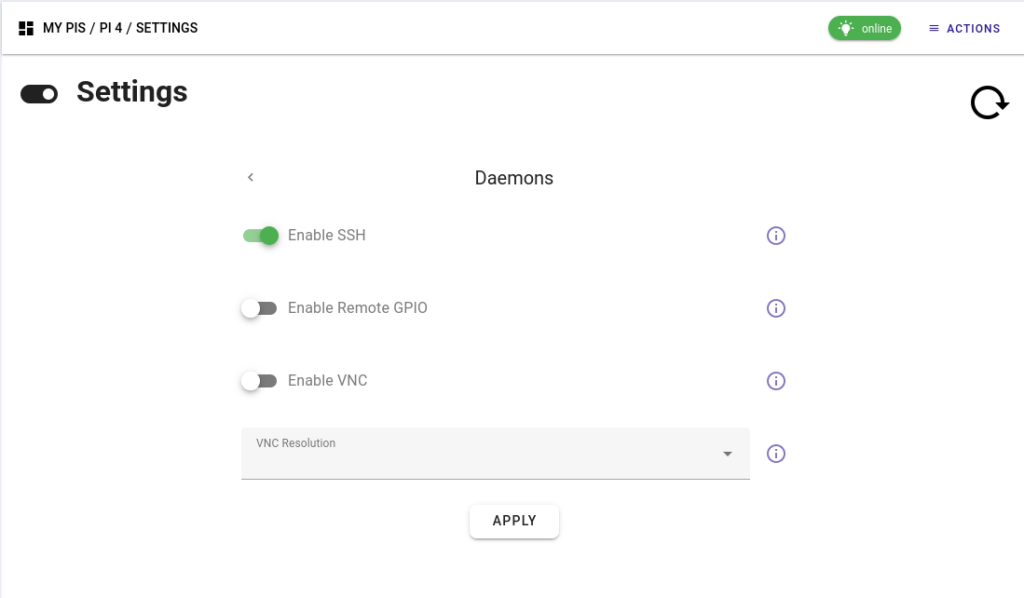
How to Enable SSH Remotely
Enabling SSH remotely is ideal if you don't have direct access to your Raspberry Pi. Follow these steps to set it up:
Step 1: Prepare Your Raspberry Pi
Ensure your Raspberry Pi is properly set up with the latest version of Raspbian or your preferred operating system. Write the image to an SD card and insert it into your Raspberry Pi.
Step 2: Connect to the Network
Connect your Raspberry Pi to the network using either Wi-Fi or Ethernet. If you're using Wi-Fi, ensure that the SSID and password are correctly configured in the wpa_supplicant.conf file on the boot partition of the SD card.
Step 3: Create the SSH File
To enable SSH remotely, create an empty file named ssh (without any extension) in the boot partition of the SD card. This file acts as a flag to indicate that SSH should be enabled on the next boot.
Once the file is created, insert the SD card into your Raspberry Pi and power it on. SSH will be automatically enabled during the boot process.
Securing Your SSH Connection
While SSH provides a secure connection, it's essential to take additional steps to protect your Raspberry Pi from unauthorized access:
- Change the Default Password: Update the default "pi" user password to something strong and unique.
- Disable Root Login: Prevent direct root access by disabling root login in the SSH configuration file.
- Use Public Key Authentication: Replace password-based authentication with public key authentication for added security.
- Limit Access: Restrict SSH access to specific IP addresses or ranges using firewall rules.
Implementing these measures will significantly enhance the security of your SSH connection.
Common Issues and Troubleshooting
Even with careful preparation, issues can arise when enabling SSH on your Raspberry Pi. Here are some common problems and their solutions:
- SSH Not Working: Verify that the
sshfile exists in the boot partition and that the Raspberry Pi is connected to the network. - Connection Refused: Check the IP address of your Raspberry Pi and ensure that the SSH service is running.
- Authentication Failure: Double-check your username and password, and ensure that public key authentication is correctly configured.
If you encounter persistent issues, consult the official Raspberry Pi documentation or seek help from community forums.
Alternatives to SSH for Remote Access
While SSH is the most popular method for remote access, there are alternative tools you can consider:
- VNC (Virtual Network Computing): Allows you to remotely control the graphical interface of your Raspberry Pi.
- TeamViewer: Provides an easy-to-use remote access solution with cross-platform compatibility.
- Web-Based Interfaces: Some applications offer built-in web interfaces for remote management.
Choose the tool that best fits your needs and technical expertise.
Best Practices for Using SSH
To make the most of SSH on your Raspberry Pi, follow these best practices:
- Regularly Update Your System: Keep your operating system and software up to date to protect against vulnerabilities.
- Use Strong Passwords: Avoid using common or easily guessable passwords for your SSH accounts.
- Monitor Logs: Regularly review SSH logs to detect any suspicious activity.
- Limit User Access: Restrict SSH access to only those users who need it.
By adhering to these practices, you can ensure a secure and efficient SSH setup on your Raspberry Pi.
Conclusion
Enabling SSH on your Raspberry Pi remotely opens up a world of possibilities for managing and interacting with your device. Whether you're setting up a headless configuration or need to troubleshoot from afar, SSH provides a secure and reliable solution.
Remember to follow best practices and secure your connection to protect your Raspberry Pi from potential threats. If you found this guide helpful, consider sharing it with others or exploring more advanced topics related to Raspberry Pi and SSH.
Feel free to leave a comment below with any questions or feedback. Happy hacking!